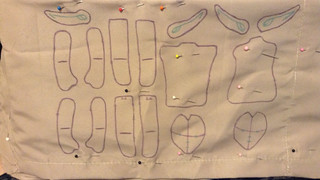
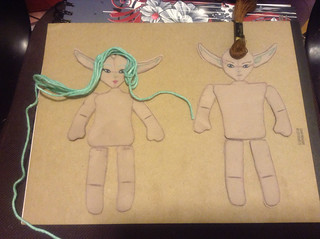
A little sneak peak at a project that is still in progress. It's mostly hand sewing which I've never really done. Figured would give me a good little project i could practice on while I'm watching streams online or t.v.
Still working on a name for them, let me know if you have any ideas. I've considered poppet dolls, mini fey, Thimble dolls (decided they aren't small enough for this one)
So I've been really interested in vintage style patterns recently. Unfortunately thanks to being on the plump side and having ginormous knockers non of the real vintage patterns are remotely close to my size. Luckily vogue and butterick have recently re-released some of their vintage patterns with updated sizes.
I saw this one and just fell in love with it.
I've actually finished the dress already but haven't got pictures of it worn yet. Hopefully i can get those up soon. I did modify it a bit.
This is a cute plaid fabric i had a ton of and the bodice is lined in a purple satin.
Until i get some picture here are two of the during progress pictures.
This is the build-a-bear bunny i had made in a fun trip i went on with my sister in law. She collect these dolls and has an amazing huge collection. Well once i was there i couldn't resist. She's melody rabbit from the hello kitty brand. The clothes there are kind of expensive for them but very cute. I decided instead to bring her home and make my own dress for her.
This was a pink fabric leftover from a dress i made for my cousin and a stretchy binding for the sash. I drafted a little pattern for her first and then pinned it on her to make sure it would fit.
Awhile ago was my mother in laws birthday. She's a humongous fan of the Utah Jazz and doesn't miss watching a single game of theirs. When her birthday came I really wanted to make something personal for her instead of just buying another Jazz mug or t-shirt. I saw this awesome soft fleece at Walmart and decided it must be a blanket. It's monogrammed using my Brother's monogramming feature and it turned out quite lovely as a bit of personalization. I ended up not using any interfacing to do the embroidery cause i didn't want a weird stiff part on such a soft blanket. I just made sure to pull the fleece very tight over the frame. It worked perfectly and I'm really glad i didn't interface that part.
The binding is a satin blanket binding. It was my first time doing mitered corners and I was a bit daunted by it. I think they turned out pretty good and the feeling and look with the blanket edging makes the blanket much nicer. I enjoyed this so much and she seemed to adore it. I was so happy to see how she liked it. I think this year all family members are getting a personalized blanket. That way they all have something I made for them. I saw some really cute disney fleece panels on frabric.com that are tempting me.
note: this blanket took 2 yards of fleece and 2 packages of blanket binding. For those interested in making similar. blanket was a nice full lap sized blanket that was more then big enough to cover me while sitting down on the couch.
So as a follow up to my last review with the Bikini cut ottobre pattern I also now tried the Hipsters.
These were pretty easy to sew my only problem was the fold over elastic because I've never used it before. I pre-ironed one side of the elastic and that helped a ton getting it on evenly. The pattern itself isn't boy shorts but definitely has more coverage on the but then the Bikini did. It is also lower on the legs then the bikini ones. I liked these a lot but for my personal taste i prefer the Bikini style.
The fabric is this super cute stripey fabric i got from Fabric.com and the cute pink fold over elastic was from SewSassy which i got in one of their random packs with some other cute colors. My sisters and mom each made some at our sewing party too, so hopefully I can post pictures of them soon. They all turned out super comfy and cute. Success!!!
These are from Ottobre 5/2009 pattern 2A the simply basic underwear in bikini style cut. I did the pattern in size 48 (European sizing) I used a basic black stretchy knit fabric i had laying around in my stash for ages and some gorgeous stretch lace from Sew Sassy Fabrics It's very pretty and soft and i love the bright color to contrast with the black.
The instructions were very easy to follow although having never made underwear before I didn't quite understand the gusset instructions. I found a great diagram of how to do it here This made them much more comfortable and look very professional and finished on the inside.
I love the pattern it fits me perfectly and sewed together quick and easily. The double layer gusset gives a nice protection for the crotch area and i like that the seam are enclosed on it.
Absolutely would recommend this pattern! I'm actually having my mom and sisters over for a panty sewing party this weekend and we plan to make many more for each of us. These fit so well and are super comfortable!
You should try it you'd absolutely love it! If you want to see my complete review you can check it out HERE at pattern review.com Stay posted for the awesome matching camisole top!
Put up a review of my sewing machine on pr. You can view it Here. Or look below lol Put up a review of my sewing machine on pr. You can view it Here. Or look below lol
A year ago approximately my lovey bought me the Brother LB6800THRD from Costco. This machine was a significant upgrade from my old Brother machine which was the cheapest beginner machine you could buy at walmart. I'd had really good success on that Cheap machine which really made me when looking to upgrade want to stick with Brother brand. I like that i can find needles and bobbins for them without going to sewing machine shop. They have them right at walmart most of the time.
The new machine cost $389.99 and was bought from costco.com LInk Here are the accessories that it has-
4" x 4" embroidery frame
8 presser feet
Assorted accessories, needles & tools
Bobbin clips
Operation manual in English & Spanish
Vinyl cover
Instruction CD
USB Cable
And here are some of it's listed Features-
Embellish it with embroidery 70 built-in designs, 5 alphanumeric fonts, 120 frame patterns
Design it with sewing 67 built-in stitches, 98 stitch functions
Built-in variety of utility and decorative stitches
USB cable for computer connectivity
Embroidery rotation in 90”, 10” and 1” increments
Large 4" x 4" embroidery field
On-screen editing to create the perfect embroidery patterns
Built-in memory allows user to save up to 12 embroidery designs or 512KB of data
Built-in card slot enables use of 1000s of optional Brother® embroidery designs
Easy-to-view, backlit touch screen LCD with on-screen reference guide in 16 languages
Advanced needle threader saves wear and tear on eyes/fingers
Automatic push-button thread cutter
Super bright led-lit work area
Super easy bobbin winding system
Quick-set drop-in bobbin – drop in full bobbin, pull the thread through slot and start sewing
7-point feed dogs
Programmable needle up/down
What I like about this machine It helped bring my sewing up from beginner lvl. It has many options and sews so much smoother then my old non-computerized cheap machine. I adore the drop in bobbin which almost never snags, and the needle threader is great for me since my hands tend to shake.
The bobbin winder works fantastic, and the machine stitches are very neatly placed. I love the different stitches there are and often like to use some of the decorative ones for hems. The machine is lightweight due to being mostly plastic which some people don't like. For me it's perfect cause it's light enough to take with me to my friends house when we have sewing parties. The feet snap on easy, and it comes with quite a few feet. The embroidery part of the machine works pretty well and I love that you can hook it up to your computer and transfer pes files directly to the machine. I was able to get quite a few free embroidery designs online this way. It also came with a large starter pack of embroidery threads for the machine in different colors.
This machine has so many useful things it can do. If you can't afford one of the really nice machines like a Bernina or Janome, and love the extra's like i do (not having to snip the thread, needle up down position, needle threader, one step buttonholes in various designs, embroidery and monogramming) you will absolutely love this machine.
What I don't like about this machine The only thing that I didn't care for on this machine is that the embroidery hoop is very small. It's only 4inches x 4inches which is the smallest size. Also it's not compatible for a larger hoop so you can't buy one and use it cause the carriage only fits the smaller size. Yet for the cost it's well worth it and still makes very cute designs!
Conclusion This is a very nice affordable machine. In the whole year I've been using it I've had absolutely no problems with it. I very highly recommend it.
As I was surfing the web one day I discovered these sewing magazines from Finland called Ottobre. Each issue has a bunch of patterns in many sizes. Even more exciting they have a version in English. So I had order a few to try them out. I bought one kids one and one adult one. They release four kids mags every year and two adult ones.
This is the cute dutch girl skirt that I made for my little cousin. Doesn't she look absolutely darling in it. The moment I saw this blue and white fabric it reminded me of dutch ceramic that my husband has shown me before.
The bottom layer is a thin woven linen material, and the top layer is a stretchy sheer that I found on clearance at walmart. The pattern is from Ottobre 6/2008 Pattern #33 "Double-layer" skirt in size 146
I loved this pattern. It was pretty easy to put together and I finished it in an evening. She loves the skirt and says it's very flirty. I did decide to leave off the second layer casing with tie because the material was so sheer. I would definitely recommend the pattern and plan to sew it again. This magazine is super cool. The tracing of the pattern looks daunting at first but I found it pretty easy to find the lines I needed. Now I want more Ottobre's!
So I have this lovely Japanese 27cm soft bust obitsu my sister got me as a present. She is fully jointed and able to pose in all sorts of fantastic ways. Then she got her a pretty blue haired head with blank face for me to paint. I love the blue hair its shiny long and soft and reminds me of mermaids. I decided she would eventually be made into a loosely greek themed water or sea nymph.
So I started her face up and am really loving all the blues and greens. She seems much nicer now that she has an actual face. I really like the shape i made her eyes although they still need some highlights, and eyeshadow.
Then I decided to make some dolly jeans from my friends leftover scraps. She loves to cut up her pants to make shorts. I used this blithe doll pattern.
The pattern was super easy to put together and I love the flared legs! Hardest part of the whole thing was turning the legs right side out at the end.
They sit a bit funny on her hips since she has way bigger hips then the blithe doll, but over all I adore how they came out.
If you are interested in getting obitsu's for yourself we buy ours from Junkyspot.com
So I technically was going to give these to my youngest sis for Christmas. It's another pair of pajama pants. I'm finding it my personal mission to make sure everyone in my family has some pajama pants made by me. Since she lives in California and I didn't get to see her for the holidays this was given as a spring/Easter present instead.
She's a bit of a hippie and loves bright colors and designs. I found this soft flannel with bright flowers stripes and paisleys all over it. It totally screamed her personality to me. Most of all it's a warm soft fabric and should be very comfortable.
Here is a closeup of the print and one of the decorative contrast pockets.
If you are new to learning to sew, or teaching yourself you should definitely consider starting with a pajama pants. It's very easy once you do two you can whip them out fast, and the family loves them!
For these I used Simplicity 2721, but recently helped my little sis make some matching pajama pants for her and her boyfriend using New Look 6321 and liked it much better. The new look pattern has real pockets in the side seams as well as a better shape. The pattern pieces were easier to cut out on the fabric since they weren't as big as the the simplicity patterns. I want to try making the shirt from 6321 for my hubby as well since the pants turned out so good.
So I made to go along with the set I made for my middle sister for her birthday, another set for my youngest sister. This one in a green color since that is one of her favorites.
It's being modeled by the middle sister so the shirt doesn't quite fit on her right.
I love how the sleeves turned out but if I did it again I'd do the smocking closer to the underbust area. I still think it gives a very cute peasant blouse look.
The matching handbag is green with a cream satin lining. I then put cute hippy flowers all the way around the bag hand stitched on. You can buy these at walmart in a pack with different sizes and colors.
The outside of the bag is made of pockets shown holding my phone quite well.
Found some cute matching ribbon for the drawstring and has a nice spacious area inside for whatever knick knacks she needs to carry on dates with her.
warning: the following post is long with lots of text and mushy feelings. If you are not into these things please scroll down to the pictures and look at the sewing goodness. This month was my sister Seanna's birthday. She's in her lower twenties and taking the world by storm. We are only three years apart, which meant that growing up I bossed her around, tortured her, and spent lots of my childhood playing with her. She was the one that I concocted adventures with.
When I had horrible night terrors she was the one who I climbed in bed with (yes I know I'm older she should have been climbing in with me). No matter how late at night or how tired she was she never once complained. I'd whisper "Seanna tell me a story, so I don't think about the dream" and she would half asleep come up with some bizarre story to distract me. It always worked and I'd fall back to sleep. As we got older it was often me doing her make up, or her stealing my clothes, I would go to her when I needed to vent, and she'd come to me to brainstorm idea's for her art.
She's got to be one of the most talented and artistic people I know. Whether it's sewing clothes for a doll, creating bead sculptures of fairies and dragons, or drawing and painting fantastic pieces of fantasy art; she just excels. Even now she and I are always talking about ideas for creative projects, helping explore ideas and possibilities on each others creative processes.
I've always believed that soul is thicker then blood. Many times people are born to families that are not nearly as loving or supportive as people we meet along the way who are like family to your soul. Often we adopt those people into our family. I'm very blessed to have a sister who is not only a blood sister but also a soul sister. How greatly blessed I feel to have been able to grow up beside her. Happy Birthday Seanna, I hope you find all the most wonderful things in life, and hope you never stop creating the fantastic things you do!
For her birthday I really wanted to go all out and do something special for her. It took me approximately two and half weeks to make everything here. The most difficult was the bag.
I started out with making her some comfy pajama pants. I found this fun teal Tye Dye material in flannel and felt it was just perfect. (all shades of teal are her favorite but especially dark tones)
The flannel is soft and warm with out being too bulky like fleece. They are loose enough to lounge in but have a drawstring so they don't fall off her butt. Also after making a pair for my husband last month he suggested that the only things he would have added to his besides a drawstring (i was too lazy to add one to his) was some pockets. He said they are nice for when he needs to run some errands and needs a place to put his keys or wallet.
So pajama pants version 2.0 have two feminine style pockets in the front. She really loved the look of them.
This is her checking out her new digs. "wow, awesome dude" (yep we are orginally california girls so everything is sprinkled with the word dude or awesome)
Here is a nice view of the cute little pockets. When I make my next Men's style I'm going to do larger pockets with a closure since they have bigger wallets and don't carry purses. She's carries a purse so these stylin ones are more for knic-nacks and treats.
Pajama pants are rather easy so I decided I needed something a little more swanky in there for her too. Something she could wear out on a date, or to church. Also long sleeved since winters here are pretty cold and snowy. I present bell sleeved romantic shirt in her Fav color again Dark Teal. This material took me a long time to find but has the perfect shade of teal. Her being an artist the shade does make a difference. It has elegant scroll designs and a cool gradient between the teal and the dark blue. That way its not too teal.
My biggest fear was that it wouldn't fit right. I had measured her before hand but couldn't have her trying it on before the big reveal since that would ruin the whole surprise. Luckily the measurements were accurate and it fit perfectly. The pattern was a gift from my Step mom McCalls pattern M5050. This one was the size small. The pattern was easy to follow and had great instructions.
Then I made a matching handbag to go with the shirt. It is lined with a black satiny lining material. There are three pockets around the exterior of the bag and the main pouch is closed and carried by a cute drawstring. This was cut out from Simplicity pattern 5320 D. Ditty bag. The original patterns are really for a patchwork style quilted bags. I loved the shape of the bags but don't care for the patchwork quilt look. (it screams old lady bag to me)
So I used the basic pattern but took off the top row of the external pocket that is patchwork, and used the same material for all the external parts. I think this made it look more modern and hip.
I also used a medium to heavy interface material to help the bag be sturdy. The pattern calls for fleece, but I just used the firm kind I had on hand which I liked better. I used it on the bottom and the external pocket but not on the main body of the bag.
It goes nicely with the shirt, but she can also use it with other outfits, Its small and easy to carry but still has plenty of room on the inside for her wallet and makeup etc.. The outside pocket is perfect for her cell phone and lip gloss. (If anyone is interested in these hand bags, or the shirt handbag set let me know and I'll make more for my etsy shop.)
Here is a closeup of the detail on the sleeve. Its a really pretty bell shaped sleeve. I love this shape of sleeve it for some reason makes me think of Romeo and Juliet. It was the one thing she'd requested if I'd ever make her a shirt was to have the bell shape sleeves.
If that wasn't enough I decided she must have home made cake. So I made from scratch a vanilla yellow cake with a white cream pudding filling. It's decorated with cream cheese frosting which was very tasty!
Now this is my first time really trying to decorate a birthday cake and in my opinion it looked like a train wreck. The layers weren't the most even and of course my tips weren't liking the cream cheese frosting for the piping. Fortunately even though I wanted to cry and call it my ugly duckling Seanna loved it and thought it looked great. (maybe just sparing my feelings) I even tried to hand mix the food coloring so she could have teal frosting haha. It turned out a little more blue green then teal though.
The face she's making here is due to mom saying that there are so many candles we might end up with wax on the cake. Apparently candle wax doesn't sound tasty *rolls eyes*
The birthday girl made a wish and blew them out. We feasted on Asian themed dinner with home made egg rolls and then spent the evening rocking out on rock band for the Wii!
This summer was full of fun and crafts as well as baking. Here is some of the fun things that were made. There was more but unfortunately I didn't get pictures of everything we made.
We went and visited my Parents in California this summer. My Step mom is the best seamstress i've ever met. She sewed this cute little number for bubbles in like 10 minutes. She has her own flower girl dress shop and also can do custom orders at http://www.flowergirlshoppe.com/
The adorable hair accessories were made by my good friend Shae. She has a gorgeous line of jewelry that she sells locally. She also did the photographs since she's much more talented with a camera then I'll ever be!
Here is a dress that I made. It was this cute pink cotton I've had laying around for several years now. It has a cute french scroll work style design on it. Bubbles thought it made it look less kiddy and more young lady like. It has straps and was flowy so she could be comfortable in the heat of the summer.
Also exceptionally great for dancing in, pretending she's a fairy, or spinning and watching it puff out. (Isn't she so dang photogenic?)
This is actually the second thing I made this summer after the cute blue checkered skirt. It was a pre-smocked fabric I found at walmart. If you see this stuff and have little girls grab as much as you can. It was super easy to make into a dress (sew a tube, and add straps). Yet was so cute and with this fabric she thought it looked kind of fancy. They had three other styles of this fabric and I'm now kicking myself for not grabbing all of them. When we went back to get more they were all sold out. Definitely was a hot commodity lol.
Not pictured was a cute pink froggy zip up skirt made by my stepmother, and some summer pirate pajamas with lace. Bubbles actually sewed the pants herself, and then I did the pajama tank top using a 3 dollar clearance one we got at walmart as the template for it.
Sad part is that I think kids these days are way to freaking smart. I got a new serger for my birthday which I was so incredibly excited about, and bubbles learned how to use it faster then me. I was a bit slow and nervous on it, and here comes the 9 year old who zips out some pajama pants on it in half the time I did. Anyone else have kids that made them feel a bit dumb too?
P.s. If you can get an over locker aka serger I highly recommend it. This baby is my new best friend lol. Although super pain to thread bleh.
This summer I have my cute younger cousin staying with me. We will call her Bubbles. between cooking and crafts we decided to try out some sewing.
I've always had a blockage or wall in my head about sewing clothes. I've been afraid to try it, telling myself I'm too ignorant about sewing. Well my friends, the wall has been knocked over smashed and sunk into a bog. This ruffle skirt was made with the legs off a pair of old jeans that i cut up and bleached. I soaked them in the bleach for about half an hour. Then added to the levi was this cute blue and white checkered material.
It twirls quite nicely and Bubbles loves how it fluffs out. I'm going to make a matching hat for it, and maybe myself a jean skirt with added checkered pleats for the bottom.
A very happy Bubbles showing off the fluff on her booty. LOL
If you want to make a skirt like this as well go check out this tutorial on the xox skirt. I used it and modified it some but it gives you the basics and shows you how to figure out how much fabric to cut.
My friends kids had their birthdays last week. So as a fun surprise I made them both these cute kids hats. Left we have dinosaur and right we have bunny. They loved them so much you couldn't convince them to take them off. Hurray!
Avenging Angel Arts Etsy Shop Pendant Necklaces and Key-Rings available for order. Sometimes I'll have various other projects available for sale as well.


